BINDING THE BODY -- 1
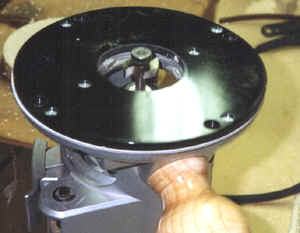 This is one of the cutters which I use to cut the binding ledges
on my guitars. It is simply a cutter with a ball bearing pilot,
and is made so that it cuts a ledge of a specific size. I have them made
for me by a local machine shop. Although this is expensive, I find
that it works better than the cutters which use a variety of different
bushings on the ball bearing to regulate the size. Recently I have
these made up by a company that I found on the internet -
Orbittool
- which makes custom cutters for routers and shapers. Their prices
are reasonable and their work is excellent. This one
is for the herringbone top purfling and cuts a ledge of .215"
-- that is .080 for the binding and .125 for the herringbone.
I size them to cut about .010 larger than the material being glued in.
This allows for a small amount of sanding and scraping of the side without
reducing the size of the binding. I have always felt that binding
is one of the most important cosmetic elements on a guitar and if the binding
is thin in some areas it will be immediately obvious and reflect badly
on the instrument.
This is one of the cutters which I use to cut the binding ledges
on my guitars. It is simply a cutter with a ball bearing pilot,
and is made so that it cuts a ledge of a specific size. I have them made
for me by a local machine shop. Although this is expensive, I find
that it works better than the cutters which use a variety of different
bushings on the ball bearing to regulate the size. Recently I have
these made up by a company that I found on the internet -
Orbittool
- which makes custom cutters for routers and shapers. Their prices
are reasonable and their work is excellent. This one
is for the herringbone top purfling and cuts a ledge of .215"
-- that is .080 for the binding and .125 for the herringbone.
I size them to cut about .010 larger than the material being glued in.
This allows for a small amount of sanding and scraping of the side without
reducing the size of the binding. I have always felt that binding
is one of the most important cosmetic elements on a guitar and if the binding
is thin in some areas it will be immediately obvious and reflect badly
on the instrument.
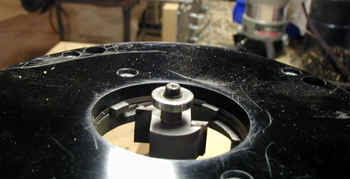 This
is another cutter, with replaceable bearings. It comes from LMI
and has a variety of bearings to provide cuts from .060 up to .230 in
increments of .010. Very useful.
This
is another cutter, with replaceable bearings. It comes from LMI
and has a variety of bearings to provide cuts from .060 up to .230 in
increments of .010. Very useful.
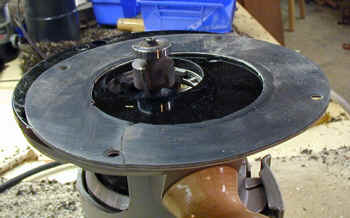 Because
I use a side purfling which is mitered into the purfling at the end block
(and on the points of a cutaway), I need a way to cut the binding ledge
accurately to accommodate this. My technique is to put a shim under
the bottom plate of the router that is the exact thickness of the purfling
I use (.079). I then cut the binding ledge at the end block, remove
the shim and recut to the full depth of the binding and the purfling.
This really works quite well.
Because
I use a side purfling which is mitered into the purfling at the end block
(and on the points of a cutaway), I need a way to cut the binding ledge
accurately to accommodate this. My technique is to put a shim under
the bottom plate of the router that is the exact thickness of the purfling
I use (.079). I then cut the binding ledge at the end block, remove
the shim and recut to the full depth of the binding and the purfling.
This really works quite well.
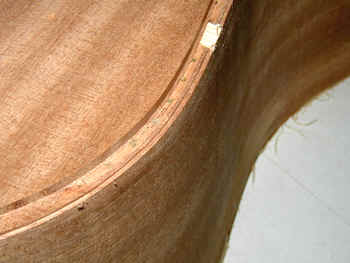
 Here
the ledge for the binding has been cut. You can see that it is cut
so that the purfling under the binding will miter into the purfling outlining
the end wedge. I will cut out the excess side wood up to the purfling
with a chisel and then cut the miters. More photos on this later.
Here
the ledge for the binding has been cut. You can see that it is cut
so that the purfling under the binding will miter into the purfling outlining
the end wedge. I will cut out the excess side wood up to the purfling
with a chisel and then cut the miters. More photos on this later.
 Here is the same thing at a cutaway. You can see
the extra depth for the binding. I will carefully trim away the
extra wood and miter the purfling to accept the side purfling.
Here is the same thing at a cutaway. You can see
the extra depth for the binding. I will carefully trim away the
extra wood and miter the purfling to accept the side purfling.
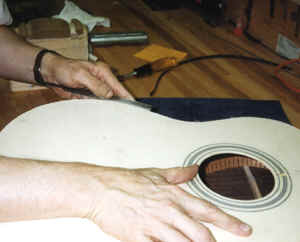
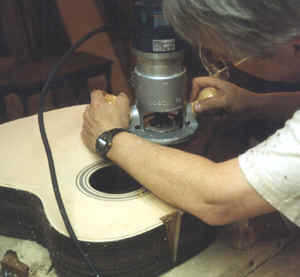 Here I am cutting the binding ledge on the top of a guitar.
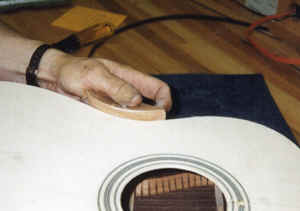
 More of the same. If the cutter is sharp, and I cut carefully,
I get a ledge that is clean and needs very little extra preparation.
More of the same. If the cutter is sharp, and I cut carefully,
I get a ledge that is clean and needs very little extra preparation.
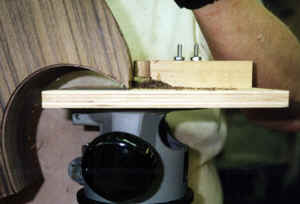
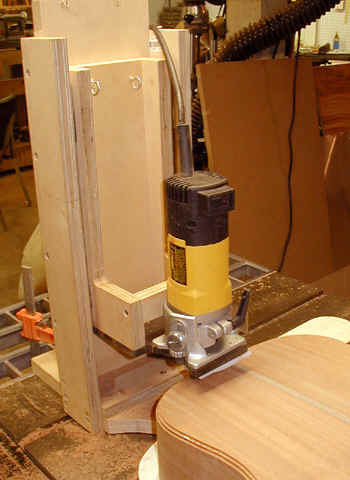 Cutting the binding and purfling ledge for the back is
considerably more difficult than for the top because the back is curved
and therefore the router (and the bit) will not remain perpendicular
to the sides. This tool (made to plans from LMI) serves to hold the router
perfectly perpendicular to the sides. A small foot rides on the
back to establish depth. Since it is quite small it is not significantly
affected by the curve of the back and an accurate cut is made. The
piece of the jig holding the router rides freely up and down using ball
bearing slides for a drawer.
Cutting the binding and purfling ledge for the back is
considerably more difficult than for the top because the back is curved
and therefore the router (and the bit) will not remain perpendicular
to the sides. This tool (made to plans from LMI) serves to hold the router
perfectly perpendicular to the sides. A small foot rides on the
back to establish depth. Since it is quite small it is not significantly
affected by the curve of the back and an accurate cut is made. The
piece of the jig holding the router rides freely up and down using ball
bearing slides for a drawer.
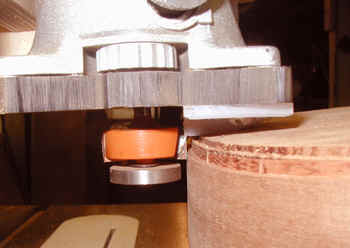 Here is a photo of the working parts of this jig, showing
the foot that rides on the back.
Here is a photo of the working parts of this jig, showing
the foot that rides on the back.
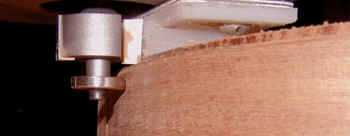 Another photo of the foot.
 Here
the ledge for the purfling on the back has been cut - the binding ledge
will follow.
Here
the ledge for the purfling on the back has been cut - the binding ledge
will follow.
 No matter how carefully I cut, there will be some spots on the top
which are a little rough. This is because spruce is a very soft
wood and because at some spots you are cutting "uphill" against
the grain. . I use the edge of a very fine file to lightly
file the edge of the binding ledge to smooth it out.
No matter how carefully I cut, there will be some spots on the top
which are a little rough. This is because spruce is a very soft
wood and because at some spots you are cutting "uphill" against
the grain. . I use the edge of a very fine file to lightly
file the edge of the binding ledge to smooth it out.
 For the inside curves where the file will not work, I have a small
wood block which is curved to match the profile of the guitar and is covered
with 150 grit sandpaper. This does the same job as the file.
For the inside curves where the file will not work, I have a small
wood block which is curved to match the profile of the guitar and is covered
with 150 grit sandpaper. This does the same job as the file.
 Cutaways present a special problem. The point of the cutaway
must be bound, but it is difficult to use my regular binding cutters.
I made this jig which is attached to the base of my router. There
is a 1/4" straight cutter below the follower which is visible here.
The photo is fairly self explanatory as to how it works.
Cutaways present a special problem. The point of the cutaway
must be bound, but it is difficult to use my regular binding cutters.
I made this jig which is attached to the base of my router. There
is a 1/4" straight cutter below the follower which is visible here.
The photo is fairly self explanatory as to how it works.
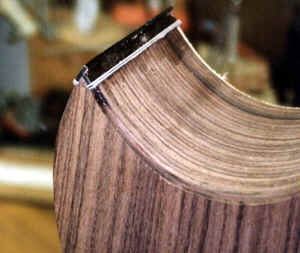 Here is the cutaway point with binding. I cut the ledge for
the inside first and glue in the binding. then I cut the outside
edge - this trims the piece on the inside so that it mates perfectly with
the outside piece.
Here is the cutaway point with binding. I cut the ledge for
the inside first and glue in the binding. then I cut the outside
edge - this trims the piece on the inside so that it mates perfectly with
the outside piece.
This website and all of its content, text and images are copyright ©1997-2012 by Charles A. Hoffman. All rights reserved.